

Recipe Overview: Your Guide to Deliciousness
Why You’ll Love These Kitchen Sink Cookies: Dive into the irresistible world of Kitchen Sink Cookies, a delightful treat loaded with a harmonious blend of sweet and salty flavors. Each bite promises a symphony of textures, featuring rich chocolate chips, crunchy pretzels, crispy potato chips, and buttery toffee bits – truly everything but the kitchen sink! These cookies are known for their incredibly soft and chewy texture, making them an instant favorite for any occasion.
Effortless Preparation: From start to finish, these delectable cookies are ready in just 30 minutes. Forget the waiting game, as absolutely no chilling is required for the dough. This means you can satisfy your cookie cravings almost instantly!
Minimal Equipment Needed: You won’t need an arsenal of kitchen gadgets for this recipe. All you require are a single mixing bowl and a reliable baking sheet, making cleanup a breeze.
Generous Yield: This recipe produces approximately 40 cookies, making it perfect for sharing with friends and family, holiday gatherings, or simply stocking up your cookie jar for weeks to come. Get ready to bake a big batch of happiness!

Discover the Ultimate “Everything But The Kitchen Sink” Cookies!
Get ready to transform your pantry staples into an extraordinary culinary experience! These “Everything But The Kitchen Sink” cookies are more than just a dessert; they’re an adventure in every bite. Often affectionately referred to as “compost cookies” due to their ingenious use of various add-ins, these treats combine a soft, vanilla-infused cookie dough with a glorious medley of flavors and textures. Imagine luscious chocolate chips melting alongside the satisfying crunch of salty potato chips, the distinct snap of pretzels, and the buttery chewiness of toffee bits. It’s a culinary philosophy that embraces creativity and minimizes waste, resulting in a truly satisfying and utterly delightful homemade cookie that proves anything goes when it comes to deliciousness. Each cookie is a unique masterpiece, ensuring that no two bites are ever exactly the same, keeping your taste buds wonderfully surprised.
What Makes These Irresistible Cookies Truly Special?
Our Kitchen Sink Cookies stand out from the crowd for several compelling reasons, making them a must-try for any cookie enthusiast. They offer a unique blend of convenience, versatility, and sheer deliciousness that’s hard to beat.
Perfectly Soft and Chewy Texture: The foundation of these incredible cookies is a meticulously crafted vanilla cookie dough, echoing the beloved characteristics of our classic chewy chocolate chip cookies. This base ensures each cookie bakes to perfection, featuring wonderfully buttery bottoms, slightly crispy edges, and an irresistible soft and chewy center that melts in your mouth. This balance of textures is crucial, providing a comforting and satisfying bite every single time.
A Creative Solution for Pantry Odds and Ends: One of the most endearing aspects of Kitchen Sink Cookies is their inherent purpose: to utilize those delightful bits and bobs lingering in your pantry. Whether it’s the last handful of chocolate chips, a few crushed pretzels, or that half-eaten bag of potato chips, this recipe invites you to get creative. While we provide a fantastic recipe as a guide, feel free to experiment with your favorite sweet, salty, or crunchy add-ins. It’s a wonderful way to prevent food waste and discover new flavor combinations unique to your kitchen.
Conveniently Freezer-Friendly: Planning ahead has never been easier or more delicious! This recipe is designed to be freezer-friendly, allowing you to whip up a large batch and store half for future enjoyment. Imagine having perfectly homemade cookies on hand for last-minute dessert emergencies, unexpected guests, or thoughtful gifts. Kitchen Sink Cookies retain their incredible taste and texture beautifully when frozen, ensuring you’re always prepared for a sweet moment.

Essential Ingredient Notes for Your Kitchen Sink Cookies
These soft, chewy, and utterly loaded cookies are a celebration of diverse flavors and textures – a little bit of everything wonderful! Below, you’ll find detailed notes on each key ingredient to ensure your baking success. For precise measurements and the complete recipe, please refer to the dedicated recipe card further down.
- Unsalted Butter: Always opt for unsalted butter when baking, as it gives you complete control over the salt content in your cookies. It’s crucial that your butter is properly softened to room temperature before you begin, as this allows it to cream smoothly with the sugars, creating a light and airy base for your dough.
- Brown Sugar and Granulated Sugar: The magic behind a truly moist and irresistibly chewy cookie lies in the perfect marriage of these two sugars. Brown sugar contributes moisture and a rich, molasses-like depth, while granulated sugar ensures the right amount of sweetness and helps with spreading and crisp edges.
- Pure Vanilla Extract and Egg: For the most authentic and robust flavor, always reach for real vanilla extract. It elevates the entire cookie experience. Similarly, ensure your large egg is at room temperature. This seemingly small detail helps the egg emulsify better with the fats, resulting in a more uniform and tender dough.
- All-Purpose Flour, Baking Soda, and Salt: Standard all-purpose flour works wonderfully, providing the ideal structure for these loaded cookies. For a slightly different flavor profile and added fiber, you could consider using whole wheat flour. Baking soda is our leavening agent, ensuring a soft rise, while a touch of salt perfectly balances the sweetness and enhances all the other flavors.
- Assorted Chocolate Chips: Why settle for one type when you can have them all? We highly recommend using a delightful mix of semi-sweet, creamy milk chocolate, sweet white chocolate, and even a handful of butterscotch chips. This combination creates layers of chocolatey goodness and visual appeal in every cookie.
- Crunchy Add-ins (Pretzels, Potato Chips, Toffee Bits): These are the stars of the “kitchen sink” concept! For this specific recipe, we suggest using classic pretzels for their salty crunch, regular or ridged salted potato chips (avoid flavored varieties to let the cookie flavor shine), and rich toffee bits for their buttery sweetness. A crucial tip: when crushing your pretzels and chips, avoid making them too fine; you want distinct pieces for maximum texture.
- Flaky Sea Salt (Optional, but Recommended): A final sprinkle of flaky sea salt on top before baking is a game-changer. It beautifully accentuates the sweet and salty dynamic of these cookies, adding a gourmet touch and an extra layer of flavor complexity that truly makes them shine.
Crafting Your Kitchen Sink Cookies: A Step-by-Step Guide
It’s time to unleash your inner baker and throw everything delicious you can find into these amazing cookies! Follow these simple, step-by-step instructions to create your own batch of sweet and salty masterpieces.
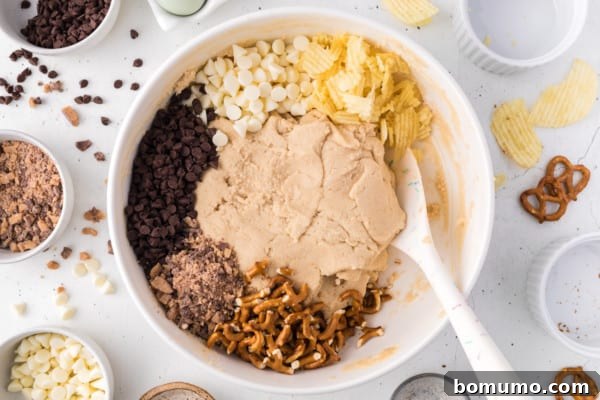
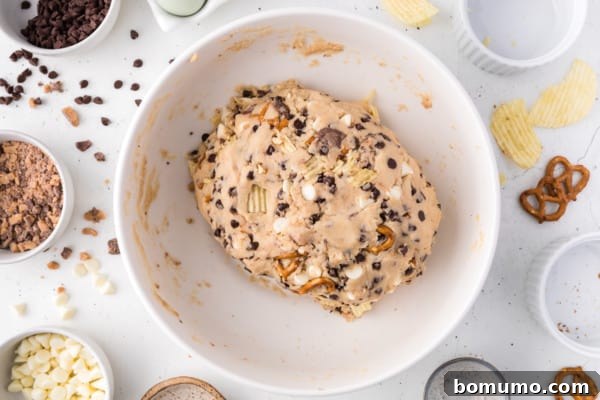
1. Prepare the Delightful Cookie Dough: Begin by creaming together your softened butter with both the brown and granulated sugars until the mixture becomes wonderfully light and fluffy. This process typically takes about two minutes and incorporates air, contributing to the cookies’ soft texture. Next, beat in the room-temperature egg and the pure vanilla extract until everything is well combined and fragrant. Finally, gently stir in the dry ingredients – flour, baking soda, and salt – mixing by hand just until the dough comes together. Be careful not to overmix, as this can lead to tough cookies.
2. Incorporate Your Treasure Trove of Mix-Ins: Now comes the fun part – folding in all those delicious extras that give these cookies their signature “kitchen sink” appeal. Carefully add your chosen chocolate chips, crushed pretzels, crumbled potato chips, and buttery toffee pieces into the dough. Use a spatula to gently fold them in until they are evenly distributed throughout the dough, ensuring every cookie gets a generous share of these flavorful additions.
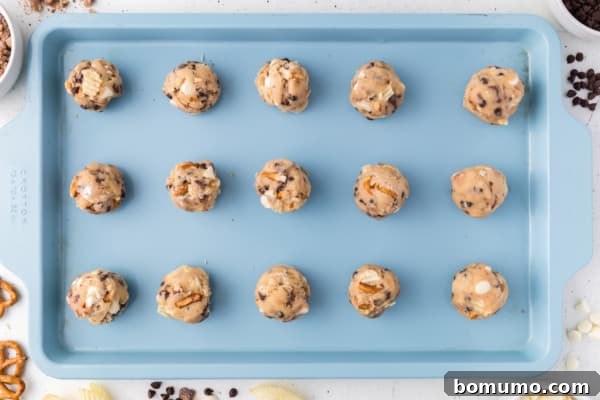
3. Portion and Prepare for Baking: Using a cookie scoop (a #40 scoop is ideal) or a tablespoon, drop rounded portions of dough onto your prepared baking sheets. Make sure to leave approximately two inches of space between each cookie to allow for even spreading during baking. For an extra touch of gourmet flair and to enhance the salty-sweet balance, consider sprinkling the tops of the cookie dough balls with a pinch of flaky sea salt before they go into the oven.
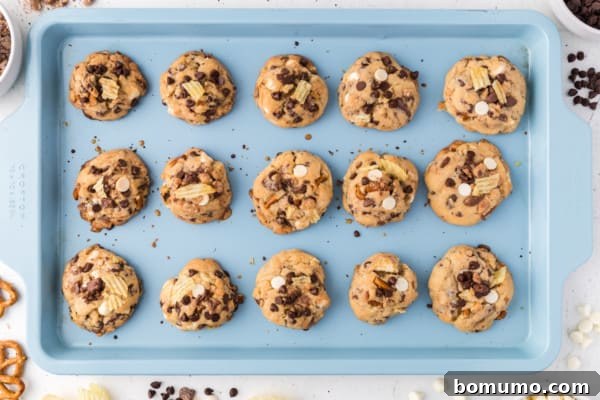
4. Bake to Golden Perfection: Place your baking sheets in the middle rack of your preheated oven at 350ºF (175ºC) and bake for about 12 minutes. You’re looking for edges that are beautifully golden brown, even if the centers still appear slightly soft – this is the secret to achieving that coveted chewy texture. Once baked, remove the cookies from the oven and let them rest on the baking sheet for 2 to 3 minutes. This crucial resting period allows them to firm up slightly before you transfer them to a wire rack to cool completely, preventing them from breaking apart. Repeat this process with any remaining cookie dough until you have a full batch of delicious cookies.
Pro Tip: Is Chilling the Dough Necessary for These Cookies?
For this specific Kitchen Sink Cookie recipe, you’ll be delighted to know that chilling the dough is entirely optional and not required. We conducted tests with both chilled (overnight) and unchilled dough, and the results showed no significant difference in the cookies’ taste or texture. This means you can enjoy your fresh-baked cookies much faster! However, if you prefer to prepare your dough in advance, or if you simply wish to chill it, you might need to extend the baking time by an additional 1 to 2 minutes to achieve the perfect golden-brown edges.

Prepare Ahead: Smart Tips for Future Cookie Enjoyment
Prepare Ahead: Smart Tips for Future Cookie Enjoyment
The beauty of these Kitchen Sink Cookies extends to their fantastic make-ahead potential. Whether you’re planning a party or simply want to have homemade treats ready at a moment’s notice, preparing the cookie dough in advance is a brilliant strategy. You can either scoop and freeze the entire batch of dough balls or freeze them individually to bake as needed.
How to Freeze the Cookie Dough: For optimal results, portion your cookie dough into balls and arrange them on a baking sheet lined with parchment paper. Place the baking sheet in the freezer until the dough balls are completely solid. Once frozen, transfer these solid dough balls into a heavy-duty freezer bag or an airtight container. They can be stored in the freezer for up to 6 months, ensuring you always have fresh-baked cookies within reach.
Baking Frozen Cookie Dough: When you’re ready to enjoy a warm, homemade cookie from your frozen stash, simply place the frozen dough balls on a baking sheet. You’ll need to adjust the oven temperature slightly to accommodate the frozen state. Bake the cookies at 325ºF (160ºC) instead of 350ºF (175ºC) for a slightly longer duration of 16 to 18 minutes. This lower temperature and extended time allow the cookies to bake through evenly without burning the edges.

Expert Recipe Tips for Perfect Kitchen Sink Cookies Every Time
Achieving the perfect batch of Kitchen Sink Cookies is simple with these expert tips designed to enhance their flavor, texture, and appearance. Follow these guidelines for baking success and cookies that will impress everyone.
- Embrace Room Temperature Ingredients: This is a golden rule in baking! Ensure your butter and eggs are at room temperature. Room-temperature butter creams more smoothly with sugar, creating a lighter, more uniform dough, while room-temperature eggs emulsify better, leading to a more consistent and tender cookie. If you’re short on time, quickly warm cold butter in the microwave for a few seconds (being careful not to melt it), and place eggs in a bowl of warm water for 5-10 minutes to bring them to temperature.
- For a Visually Stunning Presentation: If you desire cookies that look as incredible as they taste, reserve a small portion of your chosen add-ins – especially those larger pieces like potato chips, pretzel chunks, or specific chocolate varieties. Press these reserved pieces gently into the tops of the cookie dough balls just before baking. This ensures they’re prominently displayed on the finished cookie, preventing them from getting completely lost within the dough and adding an appealing artisanal touch.
- Master the Art of Not Overbaking: This is arguably the most crucial tip for achieving perfectly chewy cookies! It’s common for cookies to appear slightly underdone when you first pull them from the oven, and that’s exactly what you want for a soft, chewy texture. They will continue to “set up” and firm as they cool on the hot baking sheet. If you prefer a crispier cookie, feel free to bake them for an additional minute or two, but remember that for chewiness, a slightly underbaked center is key.

Unleash Your Creativity: Endless Possibilities for Mix-Ins!
The true joy of Kitchen Sink Cookies lies in their incredible adaptability. This is where you can truly make the recipe your own, utilizing whatever delicious ingredients you have on hand or simply experimenting with new flavor combinations. The only guideline is to maintain the right balance to ensure the dough holds together. Aim for a total of 3 cups of mix-ins, specifically limiting chocolate chips to 1 ½ cups and all other additional mix-ins to another 1 ½ cups.
- Nutty Additions: Introduce a delightful crunch and rich flavor with chopped nuts. Consider toasted pecans, almonds, or walnuts. Other fantastic options include macadamia nuts, peanuts, or hazelnuts for a diverse textural experience.
- Luscious Caramel Infusion: Elevate the sweetness with caramel! You can chop up soft caramels and fold them directly into the dough for pockets of gooey goodness. Alternatively, for a sophisticated finish, drizzle warm homemade caramel sauce over the baked and cooled cookies.
- Fun and Festive Candy Options: Turn your cookies into a festive treat by incorporating various candies. M&Ms add color and a satisfying candy shell, chopped candy bars offer a familiar favorite, Andes mints bring a refreshing coolness, and funfetti sprinkles create a playful, celebratory look.
- Sweet and Tangy Dried Fruits: For a chewy, fruity counterpoint, stir in dried cranberries, plump dried cherries, or classic raisins. These add a pleasant tang and a different kind of sweetness to the cookie mix.
- More Creative Textural Ideas: Expand your cookie’s texture profile with shredded coconut for tropical notes, crushed graham crackers for a subtle honey flavor and crunch, or hearty rolled oats for a more substantial bite (if you love oats in your cookies, be sure to try our famous Cowboy Cookies!).
- Add a Decadent Glaze: For an extra layer of sweetness and elegance, consider adding a glaze. You can borrow the simple yet delicious sweet icing recipe from our Iced Oatmeal Cookies and either dip the tops of your cooled Kitchen Sink Cookies or drizzle it artfully over them for a beautiful finish.

Optimal Storage for Freshness and Longevity
Optimal Storage for Freshness and Longevity
Ensuring your Kitchen Sink Cookies remain fresh and delicious is key to enjoying them for longer. Proper storage techniques will keep their texture and flavor intact.
Short-Term Storage: Once your cookies have completely cooled to room temperature, transfer them to an airtight container. Stored this way, they will maintain their wonderful freshness and chewy texture for up to 1 week at room temperature. For best results, you can place a slice of bread in the container to help keep them soft.
Long-Term Freezing: For extended enjoyment, these cookies freeze beautifully. Place the fully cooled cookies in a freezer-safe container or a heavy-duty freezer bag. They can be safely kept in the freezer for up to 3 months. When you’re ready to indulge, simply remove the desired number of cookies and let them defrost on the countertop at room temperature before serving. They’ll taste just as delicious as when they were freshly baked!
Explore More Easy Cookie Recipes!
Festive Funfetti Cookies
Wholesome Whole Wheat Chocolate Chip Cookies with Oats
Perfect M&M Cookies
Simple and Delicious Trail Mix Cookies
Kitchen Sink Cookies: The Ultimate Loaded Treat
Rachel Gurk
20 mins
12 mins
32 mins
40 cookies

Print Recipe
Soft and chewy kitchen sink cookies filled with a glorious medley of chocolate, potato chips, pretzels, and toffee – truly everything but the kitchen sink! This easy-to-make recipe comes together in just 30 minutes, promising a perfect balance of sweet and salty flavors.
Ingredients
- 1 cup unsalted butter, softened (2 sticks)
- 1 cup packed brown sugar
- ½ cup granulated sugar
- 2 teaspoons pure vanilla extract
- 1 large egg (preferably at room temperature)
- 2 ½ cups all-purpose flour
- ½ teaspoon baking soda
- ¼ teaspoon salt
- 1 ½ cups chocolate chips (try a mix of varieties like semisweet, milk, white, and/or butterscotch)
- ½ cup chopped pretzels (or small pretzels)
- ½ cup crumbled potato chips (don’t crush them too small!)
- ½ cup toffee bits
- Flaky sea salt, optional
Instructions
- Position an oven rack in the middle of your oven. Preheat the oven to 350ºF (175ºC). Line cookie sheets with parchment paper or silicone baking mats.
- In a large bowl, use an electric mixer to cream together the softened butter, brown sugar, and granulated sugar until the mixture is light and fluffy, which usually takes about 2 minutes.
- Add the pure vanilla extract and the room-temperature egg to the creamed mixture, and beat again until all ingredients are thoroughly combined.
- In a separate small bowl, gently whisk together the all-purpose flour, baking soda, and salt. Gradually add these dry ingredients to the wet butter mixture, mixing by hand until the dough is just combined. Be careful not to overmix.
- Carefully fold in the chocolate chips (your chosen mix of varieties), chopped pretzels, crumbled potato chips, and toffee pieces until they are evenly distributed throughout the cookie dough.
- Using a cookie scoop (a #40 scoop works well) or a spoon, drop rounded heaping tablespoons of dough onto your prepared baking sheets, ensuring they are spaced about 2 inches apart. If desired, sprinkle the tops of the cookie dough balls with flaky sea salt for an enhanced flavor and aesthetic.
- Bake in the preheated oven for approximately 12 minutes, or until the edges of the cookies are beautifully golden brown. The centers may still appear slightly soft, which is perfect for a chewy texture.
- Allow the cookies to cool on the baking sheet for 2 to 3 minutes after baking. This helps them firm up before you carefully transfer them to a wire rack to cool completely.
- Repeat this baking process with any remaining cookie dough until all your delicious Kitchen Sink Cookies are baked.
Recipe Notes
- More Add-In Inspiration: This truly is a versatile recipe designed for creativity! Beyond the suggested ingredients, consider adding shredded coconut, various chopped nuts (like pecans, almonds, walnuts), chopped caramels, or even rolled oats. For candy lovers, M&Ms, chopped candy bars, Andes mints, or funfetti sprinkles are excellent choices. Don’t forget dried fruits such as raisins, cranberries, or cherries for a touch of fruity chewiness.
- Maintain Balance for Best Results: While creativity is encouraged, remember the ideal ratio: try to keep your chocolate chip additions to 1 ½ cups, and any additional mix-ins to another 1 ½ cups, totaling 3 cups. Exceeding this amount significantly may cause the dough to become difficult to hold together, affecting the cookie’s structure.
- Presentation Pro Tip: To ensure your cookies look as good as they taste, and to highlight their unique components, you might want to save a few pieces of your more prominent add-ins (especially potato chips, large chocolate chunks, or pretzel pieces). Gently press these into the tops of each cookie dough ball just before baking. This makes them visible on the surface of the baked cookie, adding visual appeal.
- Storage Guidelines: Store cooled cookies in an airtight container at room temperature for up to 1 week to maintain optimal freshness and texture.
- Freezing Dough for Later: To prepare dough in advance, scoop it into balls and pre-freeze them on a baking sheet until solid. Once firm, transfer the frozen dough balls to a freezer bag, where they can be kept for up to 6 months. When ready to bake from frozen, place dough on a baking sheet and bake at a slightly lower temperature of 325ºF (160ºC) for 16 to 18 minutes.
Nutrition Information
Nutrition information is automatically calculated and should be used as an approximation.
Did You Bake These Delicious Cookies?
We’d love to hear your thoughts! Share a comment and your rating below – your feedback means the world to us!